
InsaneNutter
Resident Nutter
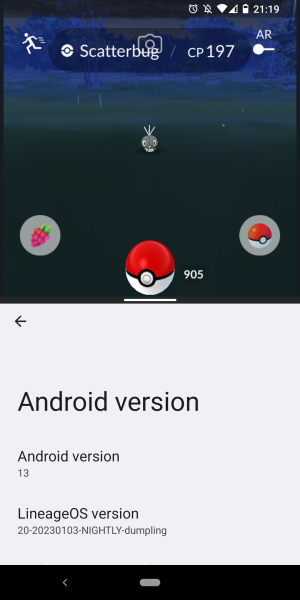
Pokemon Go doesn’t like custom Android roms, or even stock roms with root access enabled. For whatever reason Niantic think people who have custom roms or root on their Android device must obviously be cheating and there for locked out of playing the game.
I’ve personally used custom roms since 2010 on various Android devices to keep them up to date with the latest Android versions and security patches, long after the manufacturer has stopped supporting the device. In addition, having got used to all the nice tweaks, customisation and privacy features custom roms offer, I’d find it hard to go back to stock Android now as its quite limited in comparison.
Whatever your reasons are, this is how I have Pokemon Go working on a OnePlus 5T running LineageOS 19 based on Android 12. The same should apply to most Android devices however. If you have viewed this guide in the past then I have updated it to accommodate newer versions of Magisk which no longer have the ability to pass Google's SafetyNet by default. However that is really not an issue as their is a Magisk plugin to replicate the old functionality removed in newer versions of Magisk.
1. First you need to install Magisk - i’d suggest reading the Magisk documentation as this will vary from device to device, so it's impossible for me to give a step by step everyone can follow here.
However if you have a custom rom / recovery installed its usually a case of booting in to your recovery (TWRP is the most popular) and flashing Magisk to your custom rom. You can still install OTA updates with Magisk installed as its systemless, meaning you can also keep root when updating. Bonus!
I’d also recommend making a full backup of your device first too.
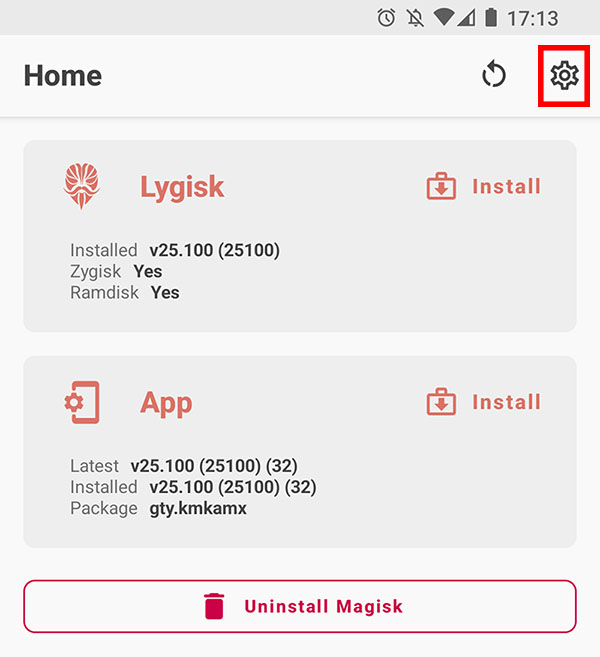
After you have installed Magisk, load the Magisk Manager app up and go to settings, which is the cog in the top right:
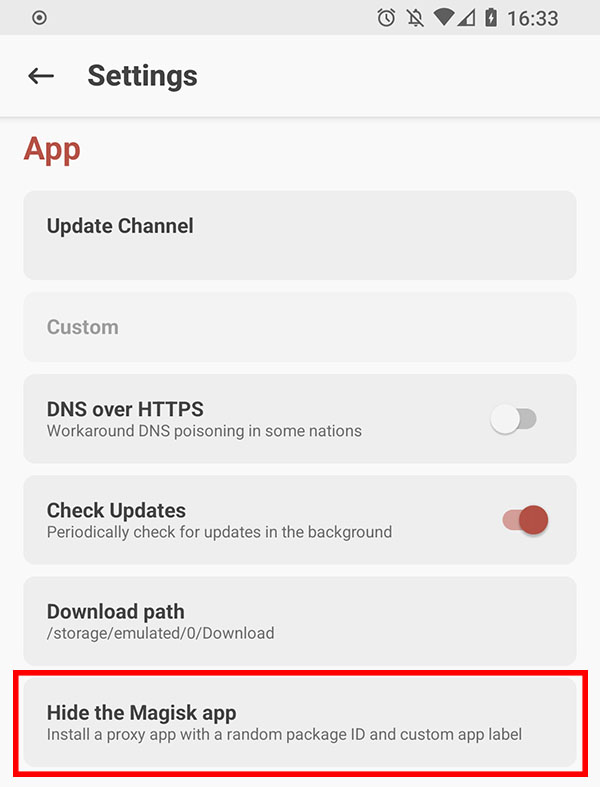
You want to hide the Magisk app, even if you can pass SafetyNet apps such as Pokemon Go will try to figure out if Magisk is installed or not and refuse to work if so:
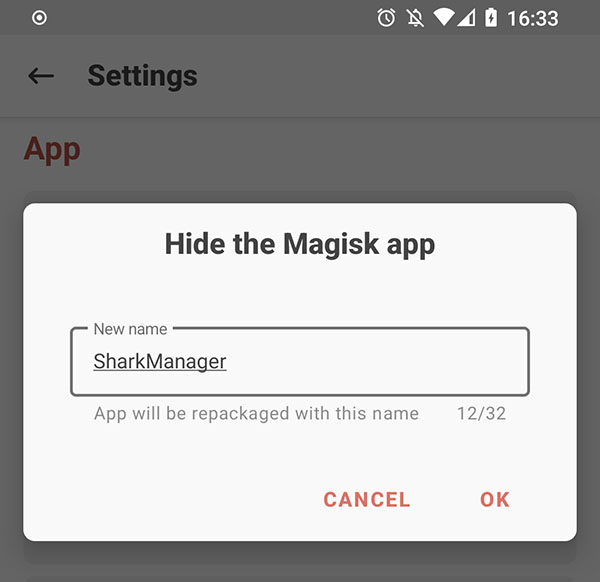
It's possible you will have to give Magisk permission to install unknown apps, do this, then go back and Give the Magisk app a random name, granting root permission when requested:
Next you want to download two Magisk plugins somewhere to your phone.
1: Universal SafetyNet Fix - This module works around hardware attestation by forcing basic attestation and recent updates to SafetyNet CTS profile checks.
2: MagiskHide Props Config - This allows you to change your phones prop to a valid one which is certified by Google, this will allow us to pass the SafetyNet CTS Profile check on a custom rom. If you are not running a custom rom and just rooted with Magisk on the stock rom this might not be required.
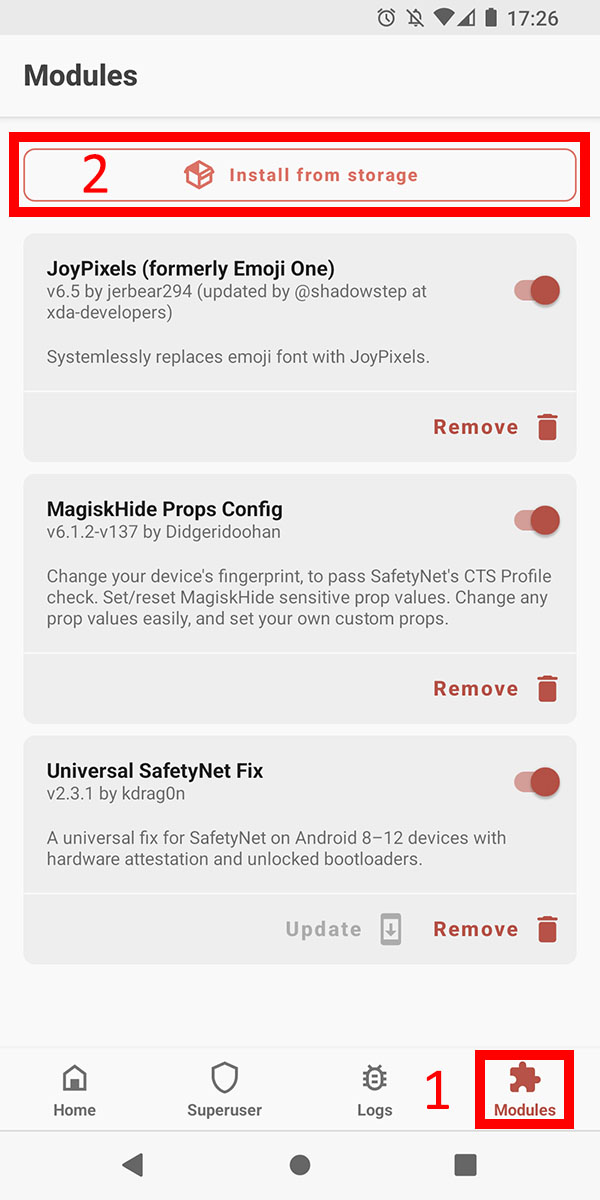
Now load your newly hidden Magisk and select Modules at the bottom right, then select install from storage:
Click the three arrows in the top left and choose Downloads (or wherever you saved the plugins to on your phone):
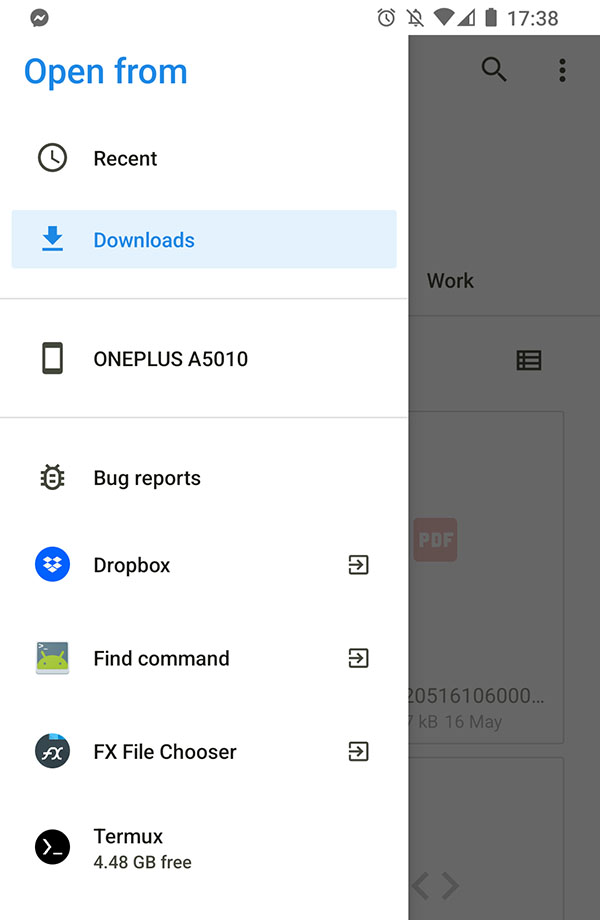
Simply click on the zip file for Universal SafetyNet Fix and the plugin will install, reboot the phone when asked and then do the same for MagiskHide Props Config.
The end result should be you have both Universal SafetyNet Fix and MagiskHide Props Config installed.
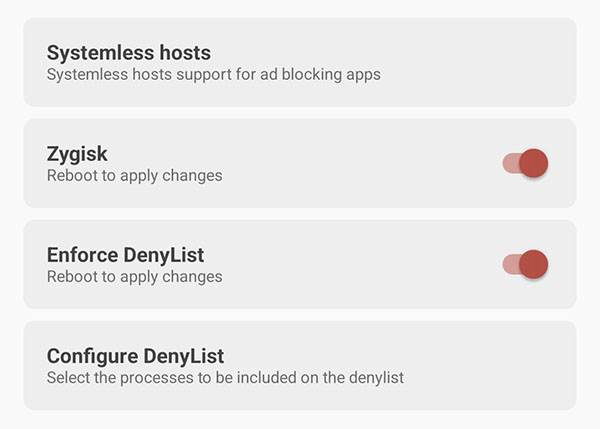
Now load Magisk up and click the settings cog in the top right again, scroll down and enable Zygisk and Enforce the DenyList:
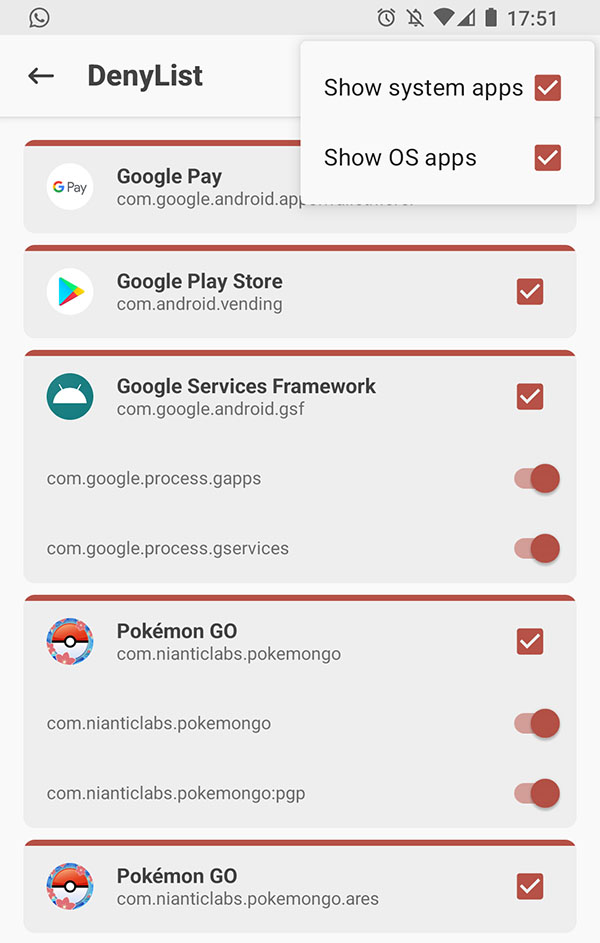
Then click Configure DenyList and select Pokemon Go, I'd also recommend you also deny the Google Play Store, Google Service Framework and Google Pay (if you plan to use Google Pay on your device):
Now you want to download Termix from the Google Play Store if you don't already have a Terminal Emulator installed, this will allow us to configure the Magisk Hide Props Config plugin we installed earlier.
Essentially MagiskHide Props Config is a script that will allow you to change your devices fingerprint to what it should be if you had no custom rom installed. Some custom roms do this automatically so this is not an issue, however LineageOS doesn't.
Type su in to the Terminal Emulator and grant Termux root when asked to:
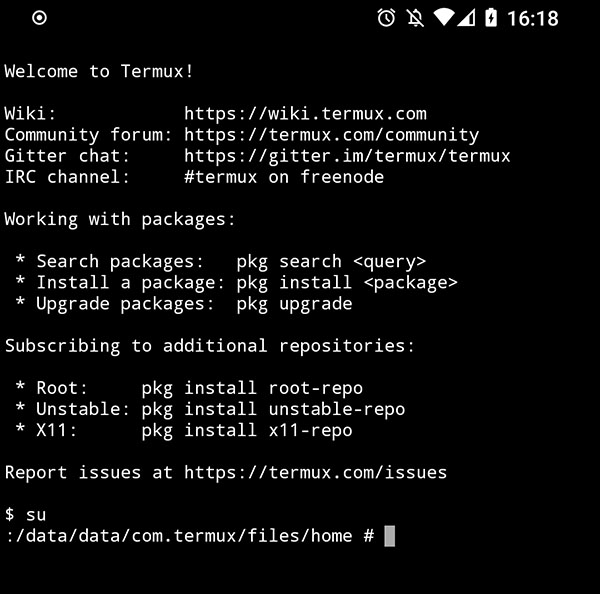
Type props in to the Terminal Emulator and MagiskHide Props Config should be loaded, then press 1 to edit the devices finger print:
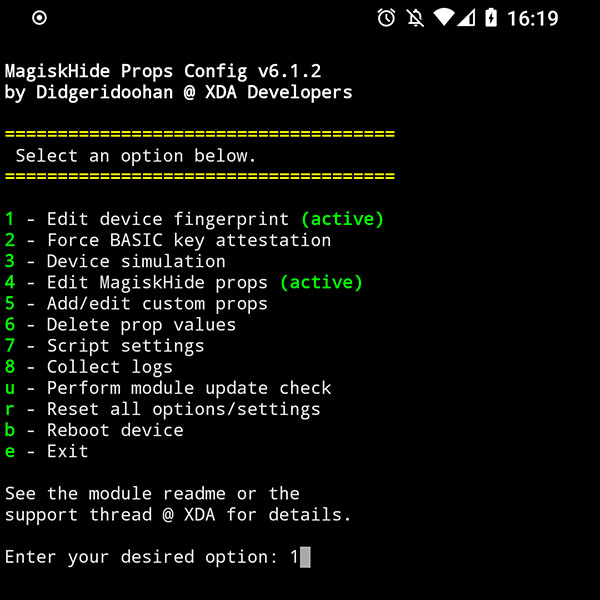
Press f to choose a certified fingerprint for your device:
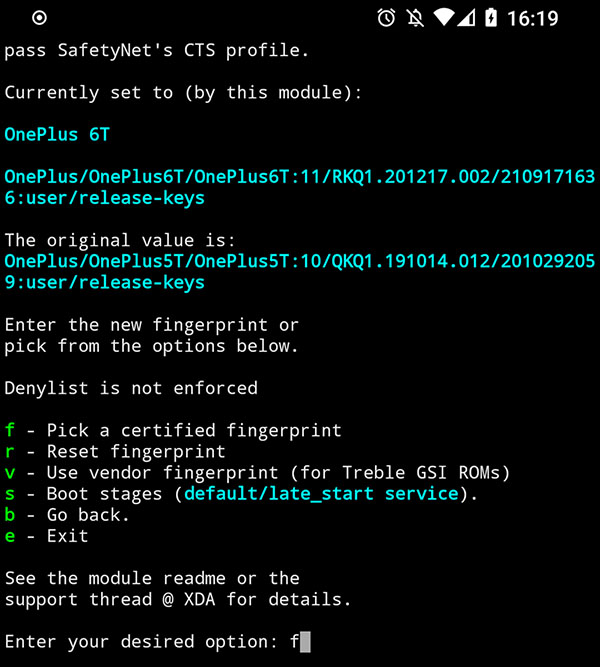
You need to choose a fingerprint that matches the version of Android your device is on, e.g. if you are on Android 12 you need an Android 12 fingerprint.
However chances are if you are running an Android 12 custom rom and your device stopped getting updates from the manufacturer with Android 10, such as the case with the OnePlus 5T, then they will be no certified fingerprint for your specific device.
However that is not a problem, we can simply use a finger print from a Google Device with Android 12, as their will always be a Google device with the latest version of Android.
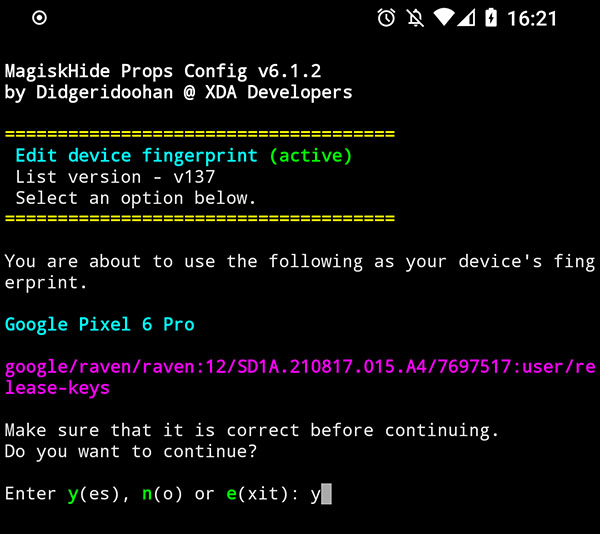
So for example type the number to choose Google, then choose a fingerprint which matches your Android version. So as i'm on Android 12 I chose "29" for the Pixel 6 Pro, as this had a certified Android 12 fingerprint available:
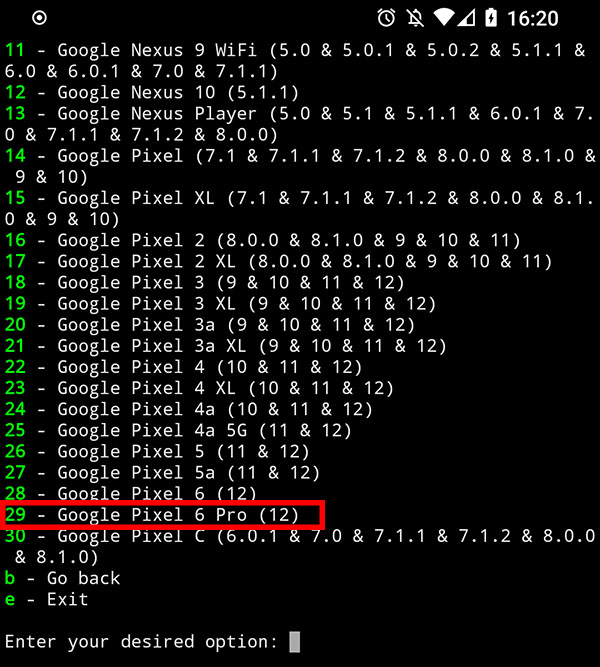
Apply the fingerprint and press y to reboot when prompted:
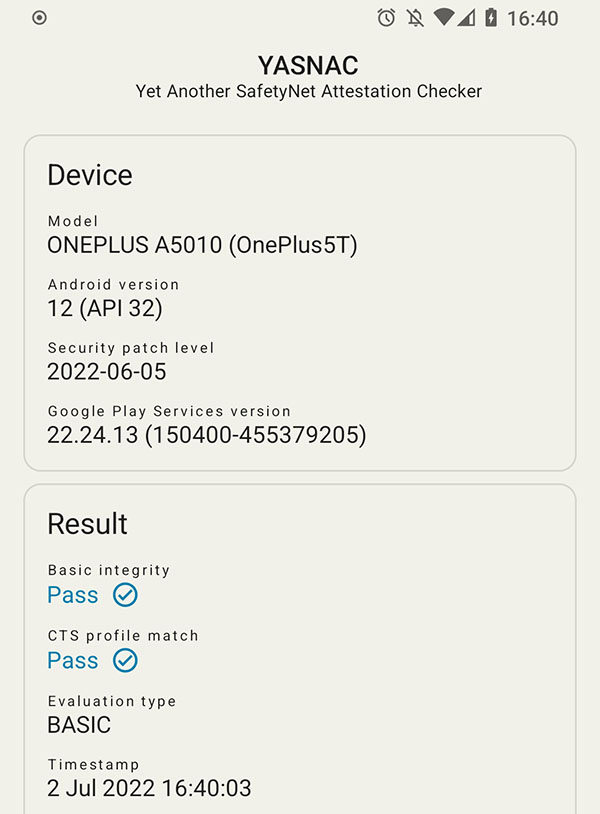
Now we can download YASNAC (short for Yet Another SafetyNet Attestation Checker) and check we are passing SafetyNet ok.
As you can see below we pass both the basic integrity and CTS profile checks:
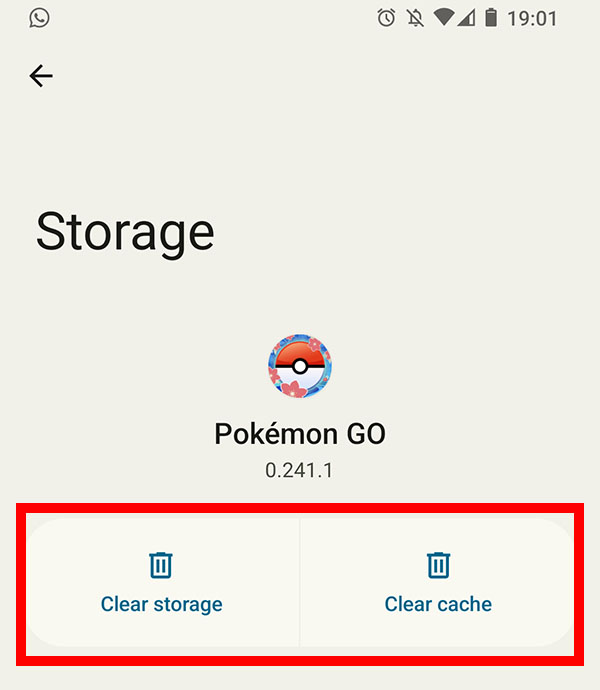
Finally go Settings > Apps > See all apps > Pokemon Go > Storage and cache and clear both the storage and cache. If you have loaded the game up before passing SafetyNet the game will refuse to let you sign in, regardless of if the phone now passes SafetyNet.
Settings > Apps > See All Apps > Google Play Service and click on Storage and Cache. After that click on Manage Space > Clear All Data.
Settings > Apps > See All Apps > Google Play Store and click on Storage and Cache, then clear storage.
It's also worth mentioning if you have any files / folders called Magisk on your SD card / internal memory Pokemon Go seems to be able to detect these, so these should be deleted.
After this you should be able to play Pokemon Go without issue with a custom rom flashed to your phone, or root enabled.
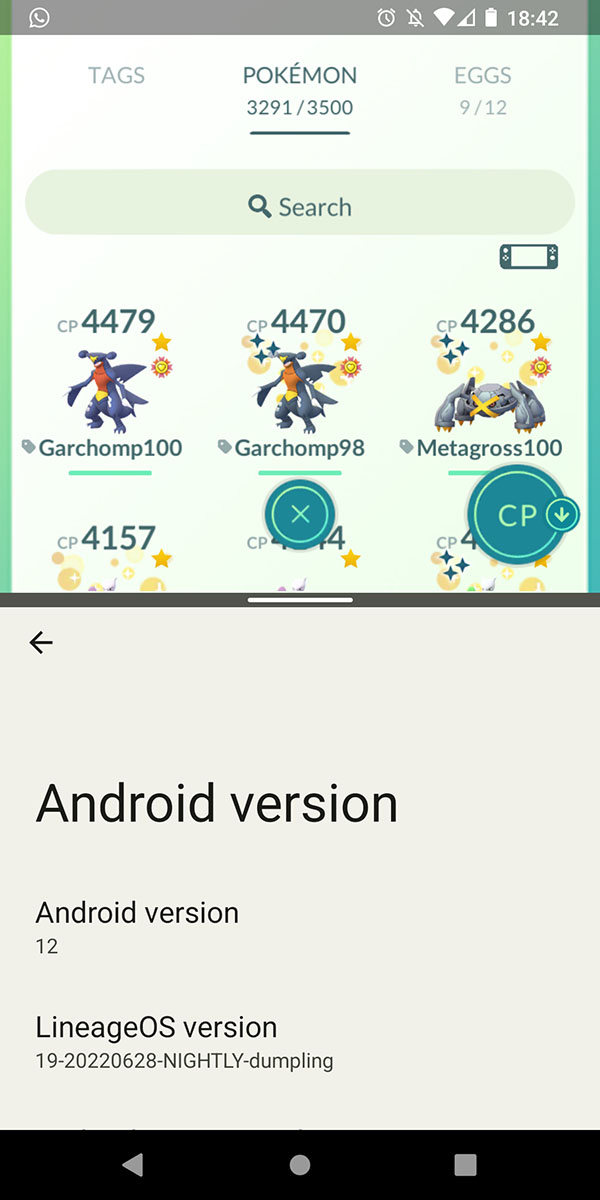
This is essentially the process I've done for several years on various LineageOS versions, it should work great on LinageOS 19.1 / Android 12 and all previous versions of Android.
Happy catching trainer!
I’ve personally used custom roms since 2010 on various Android devices to keep them up to date with the latest Android versions and security patches, long after the manufacturer has stopped supporting the device. In addition, having got used to all the nice tweaks, customisation and privacy features custom roms offer, I’d find it hard to go back to stock Android now as its quite limited in comparison.
Whatever your reasons are, this is how I have Pokemon Go working on a OnePlus 5T running LineageOS 19 based on Android 12. The same should apply to most Android devices however. If you have viewed this guide in the past then I have updated it to accommodate newer versions of Magisk which no longer have the ability to pass Google's SafetyNet by default. However that is really not an issue as their is a Magisk plugin to replicate the old functionality removed in newer versions of Magisk.
1. First you need to install Magisk - i’d suggest reading the Magisk documentation as this will vary from device to device, so it's impossible for me to give a step by step everyone can follow here.
However if you have a custom rom / recovery installed its usually a case of booting in to your recovery (TWRP is the most popular) and flashing Magisk to your custom rom. You can still install OTA updates with Magisk installed as its systemless, meaning you can also keep root when updating. Bonus!
I’d also recommend making a full backup of your device first too.
After you have installed Magisk, load the Magisk Manager app up and go to settings, which is the cog in the top right:
You want to hide the Magisk app, even if you can pass SafetyNet apps such as Pokemon Go will try to figure out if Magisk is installed or not and refuse to work if so:
It's possible you will have to give Magisk permission to install unknown apps, do this, then go back and Give the Magisk app a random name, granting root permission when requested:
Next you want to download two Magisk plugins somewhere to your phone.
1: Universal SafetyNet Fix - This module works around hardware attestation by forcing basic attestation and recent updates to SafetyNet CTS profile checks.
2: MagiskHide Props Config - This allows you to change your phones prop to a valid one which is certified by Google, this will allow us to pass the SafetyNet CTS Profile check on a custom rom. If you are not running a custom rom and just rooted with Magisk on the stock rom this might not be required.
Now load your newly hidden Magisk and select Modules at the bottom right, then select install from storage:
Click the three arrows in the top left and choose Downloads (or wherever you saved the plugins to on your phone):
Simply click on the zip file for Universal SafetyNet Fix and the plugin will install, reboot the phone when asked and then do the same for MagiskHide Props Config.
The end result should be you have both Universal SafetyNet Fix and MagiskHide Props Config installed.
Now load Magisk up and click the settings cog in the top right again, scroll down and enable Zygisk and Enforce the DenyList:
Then click Configure DenyList and select Pokemon Go, I'd also recommend you also deny the Google Play Store, Google Service Framework and Google Pay (if you plan to use Google Pay on your device):
Now you want to download Termix from the Google Play Store if you don't already have a Terminal Emulator installed, this will allow us to configure the Magisk Hide Props Config plugin we installed earlier.
Essentially MagiskHide Props Config is a script that will allow you to change your devices fingerprint to what it should be if you had no custom rom installed. Some custom roms do this automatically so this is not an issue, however LineageOS doesn't.
Type su in to the Terminal Emulator and grant Termux root when asked to:
Type props in to the Terminal Emulator and MagiskHide Props Config should be loaded, then press 1 to edit the devices finger print:
Press f to choose a certified fingerprint for your device:
You need to choose a fingerprint that matches the version of Android your device is on, e.g. if you are on Android 12 you need an Android 12 fingerprint.
However chances are if you are running an Android 12 custom rom and your device stopped getting updates from the manufacturer with Android 10, such as the case with the OnePlus 5T, then they will be no certified fingerprint for your specific device.
However that is not a problem, we can simply use a finger print from a Google Device with Android 12, as their will always be a Google device with the latest version of Android.
So for example type the number to choose Google, then choose a fingerprint which matches your Android version. So as i'm on Android 12 I chose "29" for the Pixel 6 Pro, as this had a certified Android 12 fingerprint available:
Apply the fingerprint and press y to reboot when prompted:
Now we can download YASNAC (short for Yet Another SafetyNet Attestation Checker) and check we are passing SafetyNet ok.
As you can see below we pass both the basic integrity and CTS profile checks:
Finally go Settings > Apps > See all apps > Pokemon Go > Storage and cache and clear both the storage and cache. If you have loaded the game up before passing SafetyNet the game will refuse to let you sign in, regardless of if the phone now passes SafetyNet.
Settings > Apps > See All Apps > Google Play Service and click on Storage and Cache. After that click on Manage Space > Clear All Data.
Settings > Apps > See All Apps > Google Play Store and click on Storage and Cache, then clear storage.
It's also worth mentioning if you have any files / folders called Magisk on your SD card / internal memory Pokemon Go seems to be able to detect these, so these should be deleted.
After this you should be able to play Pokemon Go without issue with a custom rom flashed to your phone, or root enabled.
This is essentially the process I've done for several years on various LineageOS versions, it should work great on LinageOS 19.1 / Android 12 and all previous versions of Android.
Happy catching trainer!
Last edited: