Hack a 250gb, 320gb or 500gb Sata harddrive to work in the Xbox 360 and Xbox 360 Slim

My Dashboard says 2.0.9199.0. That would be the latest?

When I plug the Transfer cable to the new 250GB HDD, with the old one still on the console, it shows up as a USB memory. Doesn't tell me how much memory left or the size of the HDD (when I use this drive on the console, it tells me there's 228GB free, of course without anything else oin it like profiles etc). Does that mean it is safe to transfer the original 20GB HDD to this new HDD using the cable? I hear that if its transferred using the transfer cable, the 20GB HDD is wiped clean. I just don't want to stuff up without any means of restoring the content of my 20GB HDD.

ATM I'm using this transfer cable on the PC using Xplorer 360.

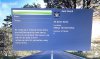
Yes thats the latest official release, if you leave it a few seconds after connecting the drive it should display the free space like this:

attachment.php


Notice the different icons down the left hand side too, does your drive have the hard drive transfer kit icon?

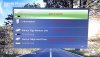
You can press Y on the drive you want to transfer the content from and select transfer content, you can then copy it to the newly hacked drive.

attachment.php


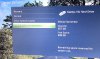
Alternatively and can go on to the old hard drive and manually copy the content one game at at time, although not all games will let you copy the saves for them and you have to move you profiles to the new drive.

attachment.php


If i was you I would copy all the content on your old drive to the PC, then try to transfer content on the console. That way even in the worst case scenario you have a backup of all your files on the PC that you can manually transfer with Xplorer 360. Its good to have backups anyway, I copy all my saves to the PC every few months just to have a backup as I would hate to ever loose them all. No hard drive will last forever sadly.
 

Attachments

  • hdd1.jpg
    hdd1.jpg
    179 KB · Views: 11,206
  • hdd3.jpg
    hdd3.jpg
    113.1 KB · Views: 9,808
  • hdd2.jpg
    hdd2.jpg
    151.9 KB · Views: 8,719
Yes thats the latest official release, if you leave it a few seconds after connecting the drive it should display the free space like this:

attachment.php


Notice the different icons down the left hand side too, does your drive have the hard drive transfer kit icon?

You can press Y on the drive you want to transfer the content from and select transfer content, you can then copy it to the newly hacked drive.

attachment.php


Alternatively and can go on to the old hard drive and manually copy the content one game at at time, although not all games will let you copy the saves for them and you have to move you profiles to the new drive.

attachment.php


If i was you I would copy all the content on your old drive to the PC, then try to transfer content on the console. That way even in the worst case scenario you have a backup of all your files on the PC that you can manually transfer with Xplorer 360. Its good to have backups anyway, I copy all my saves to the PC every few months just to have a backup as I would hate to ever loose them all. No hard drive will last forever sadly.

My screen didn't show the transfer cable icon when the original 20GB HDD is connected via the cable, just a "USB Storage Device" with a USB connector icon. Neither does it show the amount of free space. I do know that there's about 500MB free. The same happened when the new 250GB HDD was connected using the cable.

However, after using Xplorer360 to transfer files/folders from/to Partiton 3 (and also restore the Partiton 2 onto the new HDD), my new 250GB HDD now shows 215 GB free. Yipee. So far I haven't noticed any thing missing. The downloaded videos are in there as are the downloaded games.

I used the PC/desktop method as mentioned in your tutorial instead of the Microsoft method of using the transfer cable/kit but I did use the transfer cable to connect the HDD (in the enclosure) to the PC. First I dragged and drop the files/folders from Partiton 3 of the old 20GB HDD to a folder on the PC. Then I disconnected this and connected the new 250GB HDD to the PC using the same transfer cable. Then drag and drop (or is that dump?) the files/folders into Partition 3 of the new HDD. Took a while.

Having said that, when I started out with the idea of upgrading my limited 20GB HDD (MS being stingy again or just greedy), getting fed-up with not having enough space and having to delete stuffs, I thought it would be a piece of cake/walk in the park for me, a relative noob. The actual hacking of the 250GB HDD was relatively "hard" because my W7 PC wouldn't boot up the USB Hackr DOS software properly. Luckily I had an old WXP PC which after a few trials/errors did the trick. I even undo back to the old WD firmware just to make sure I can.

Then I came across your tutorial which was more comprehensive in the data transfer section, except the meaning of the word "dump" (instead of drag and drop, LOL, tried to copy and paste but no-go there) and the mention of turning off UAC. The warning about using the extreme and 250gb edition of Xplorer360 software for the respective partiton 2 and 3 is particularly important. The other tutorials never mentioned the exact procedure in using Xplorer360 and its different editions. Now in hind sight, its not too hard to save a bit of money. Save me from splashing out on a new XBox360 Slim with its standard 250GB HDD and built-in wireless. Now to wait for the time when MS comes out with a BR edition of the XBox.

Many thanks for the tutorial.
 
How long should Xplore360 take to restore the 250mb partition 2? It's been "restoring" it for about 30 minutes now and it's still looping on "restoring device".

- I used Xplore360 Ultimate 2, I have a flashed 250GB scorpio and it works in my 360, im just trying to restore the 2nd partition to get the compatibility sectors active.
- Did run the application as an admin

It's stuck on restoring device... I'll let it run but wondering if it's normal...
 
How long should Xplore360 take to restore the 250mb partition 2? It's been "restoring" it for about 30 minutes now and it's still looping on "restoring device".

- I used Xplore360 Ultimate 2, I have a flashed 250GB scorpio and it works in my 360, im just trying to restore the 2nd partition to get the compatibility sectors active.
- Did run the application as an admin

It's stuck on restoring device... I'll let it run but wondering if it's normal...
Was wondering this myself, Dont really need the backwards compatibility but thought I would have it anyway.
 
I have now been trying multiple times since yesterday with multiple versions and it still always get looping on Restoring Device...

Have no idea what I am doing wrong here...
 
I presume you are using Xplorer 360 Extreme and are running with with Admin rights?

If so run the drive though hddhackr again, chances are the partitions could be corrupt in some way.
 
The tutorial has been updated with a download for HddHackr v1.24 (Build 20100904)

This includes the following fixes:

- Fixed issue with LBA 28/48-bit address comparison
- Confirmed HddHacker supports hard drives manufactured 2010

New drive support:

- WD Scorpio Blue Series BPVT support
- WD AV-25 Series BUDT support
 
Slim is my first 360 and I'm just trying to save money

So I don't need to restore anything from an old 360 hard drive (since the slim is my first) but I want more storage space for a reasonable price. Will this work for me if just follow it until the step "Opening the 360 drive enclosure"? Or is this some extra step I'll need since I'm not putting an old 360 drives contents on my hard drive?
 
You do not require data from an old drive ;) The flasher puts everything needed on the new drive. The xbox will take it from there :)
 
The only thing you might want to restore is partition 2 from an old drive as that allows for Xbox 1 games to be played, however if that really doesn't bother you then its not essential to do.
 
I have a 2500BEVT that I bought in April, and I can't get it to work. I have it successfully flashed with the new 1.24 hddhackr using the 250gb bin file, but every time I plug the drive in to either of my 360's it gives me an e68 error. I checked the drive with Xplorer360 and it looks fine. Any advice?
 
Perhaps the folllowing to which I found HERE, will help.

E68: Hard Drive Error - Hard drive not DMA configured: It could be a problem with the Hard Drive itself or a problem with the internal connection to the hard drive, Try removing the hard drive and playing without it. Also this can be caused by a problem with the fans that make them draw too much power, it can also be caused if you have unnecessary accessories attached to the console like an external fan unit. Attempt to remove unnecessary accessories first, and then necessary components such as the hard drive and USB devices. If you have any case mods you may want to investigate those as well.
 
I've tried unplugging everything USB and I even tried with both an hdmi cable and the vga cable. I even put the jumper setting on the hard drive for reduced power spinup. I can't reflash the drive anymore since the new 1.24 hddhackr tells me that the drive is already flashed to work in the xbox 360. I know that if the partitions are screwed, then the xbox would just format the drive for me right? Since I tried this hard drive on another 360 and got the same error, is it possible that the little adapter that I am using is faulty? If I opened up my 360 and soldered in a power cable and sata cable, do you think I could bypass this? I don't want to have to shell out another 20-30 bucks for a hard drive case that might not be the problem.

I even took a sata extension cable, took off the data extension part, then ran the cable from the hdd case adapter to the data extension cable to the hard drive, and powered the hard drive externally with a sata power cable on my pc. The e68 error still came up. I am guessing that there is a problem with the data cable portion of this hdd case adapter. Does that sound logical, or is there another problem I can't see?
 
I've worked on one xbox. Sorry I can't be more help. Nutter seems to be the main expert in this thread. Perhaps he'll have a few ideas ;)
 
I need some help.

I cannot find where this file is

Select the box with 3 dots and choose the USB Drive Boot Files\MS-DOS folder as the location.
 
I need some help.

I cannot find where this file is

Select the box with 3 dots and choose the USB Drive Boot Files\MS-DOS folder as the location.

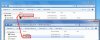
Its in the folder where you unzipped the bootable usb drive creator application to.
 

Attachments

  • files.jpg
    files.jpg
    111.1 KB · Views: 1,953
so i found this thread about a week ago, i followed everything to the T. when i get to the part where u enter in the file name to flash the drive is says the file is not there. also my bios does not have a disable feature for disabling AHCI. id really appreciate some help with this one, also i bought the same HDD you used. thanks much
 
Hi,

I have flashed a 250GB WD 2500BEVS with the 120gb HDSS files about 2 months ago,

Now i want to take this HDD out and use on my Computer, but it only shows as 120GB, so is there anything i can do?

I have formated the usb key i used with HDDHACKR so my UNDO.BIN file is gone.

Can ayone help??
 

About Digiex

Digiex is a technology and gaming forum, founded in 2004 by InsaneNutter and Nimrod. Digiex has served the internet community with breaking news, detailed guides, exclusive downloads and a popular discussion forum. A small, friendly community of like‑minded people has developed over the years. People are encouraged to register and participate in on‑going discussions.

Get Social

Top Bottom